Earlier Marvin Pro (Orin)
This page covers Marvin Pro units delivered with an NVIDIA Jetson Orin main controller, a separate camera deserializer board, and a router on the 192.168.10.x network. For current units with a Tianzhun controller, use Wiring and Marvin Pro: first teleoperation. Software compatibility compares the two versions.
System components
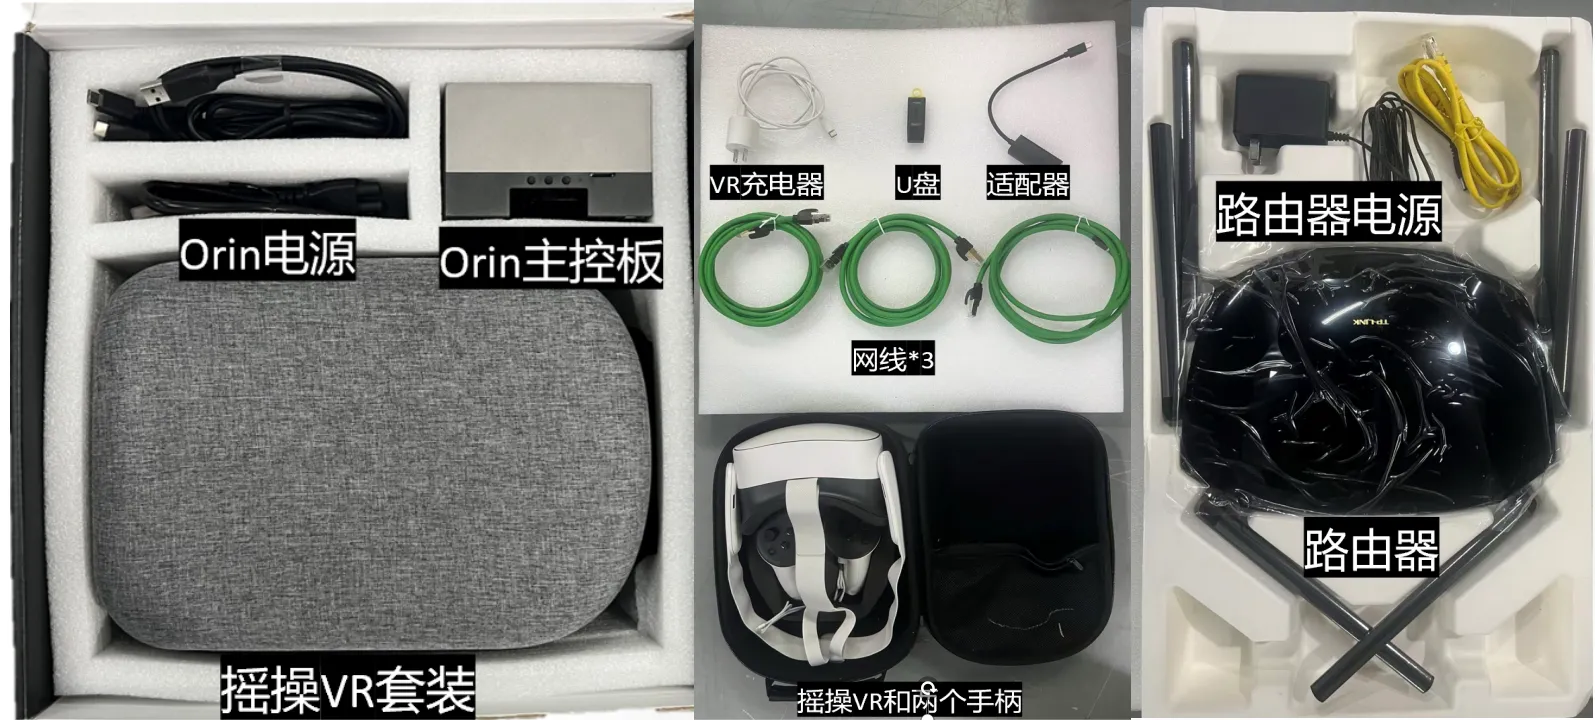
The Marvin Pro teleoperation system mainly consists of the robot body, robot controller, Orin main controller, camera deserializer board, VR headset, router, and data recording media.
| Category | Device | Description |
|---|---|---|
| Robot side | Dual-arm robot body | Executes teleoperation commands |
| Robot side | Robot controller | Receives commands from Orin and the control system |
| Power and safety | 48 V main power supply | 220 V to 48 V switching power supply |
| Power and safety | 12 V controller power supply | Powers the controller and related peripherals |
| Power and safety | Emergency stop box | Provides on-site safety protection and emergency stop |
| Main control and perception | NVIDIA Jetson Orin main controller | Runs KernelMind Apex and ROS 2 nodes |
| Main control and perception | Camera deserializer board | Supports up to four GMSL camera inputs |
| Operator side | VR headset (Meta Quest) and controllers | Provides first-person view and operator input |
| Network and data | Router and Ethernet cables | Connects the robot controller, Orin, and VR headset adapter |
| Network and data | USB drive | Used for data recording; volume label must be BAG_STORAGE |
Accessories
Standard
| Accessory | Qty | Description |
|---|---|---|
| VR headset (Meta Quest) | 1 | Provides immersive first-person operation view |
| Controllers (left/right) | 1 each | Control arm motion and gripper opening/closing |
| Router | 1 | LAN core connecting Orin, controller, and headset |
| Ethernet cables | Several | Wired connection for stable low-latency transmission |
USB drive (label BAG_STORAGE) | 1 | Stores ROS bag and MP4 recording data under recorded_bags by default |
| Type-C data cable | 1 | Used for ADB debugging or headset APK installation |
| Type-C Ethernet adapter | 1 | Connects the headset to the wired LAN |
Optional
| Accessory | Description |
|---|---|
| Manus data gloves | Capture fine finger motion; used with Wuji Hand |
| Wuji Hand | Dexterous hand end effector that receives glove motion commands |
| Foot pedal (three-key) | Maps controller enable actions to foot input; used for motion-capture glove / dexterous hand teleoperation scenarios |
Foot pedal key functions:
| Key | Function |
|---|---|
| Key 1 (left key) | Enables both left and right controllers together |
| Key 3 (right key) | Moves both arms back to the Home position |
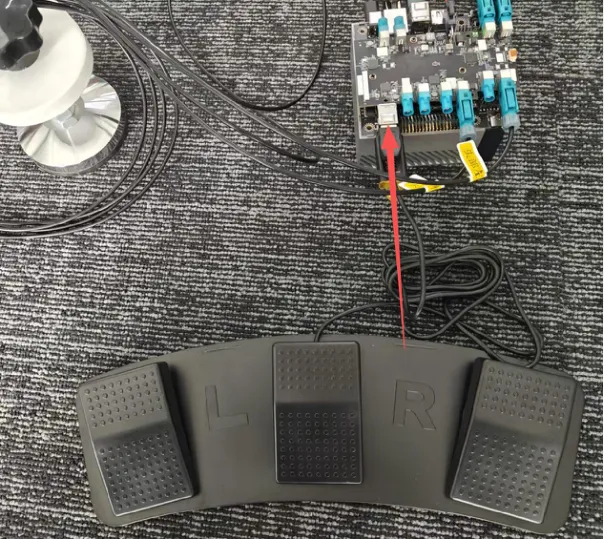
On Orin units, the foot pedal and incremental teleoperation mode are enabled by factory default.
Software
| Software module | Installation location | Description |
|---|---|---|
| KernelMind Apex Orin-side package | Orin main controller | kernelmind-apex_<version>_arm64.deb; provides ROS 2 nodes, motion control, camera, and recording services |
| KernelMind Apex headset app | Meta Quest | KernelMind_Apex_meta_<version>.apk; provides the VR teleoperation interface |
| Host teleoperation software | PC | Connects to Orin, starts the robot, switches modes, records data, and replays data |
Network
| Item | Default / Description |
|---|---|
| Dual-arm controller IP | 192.168.10.190 |
| Orin network adapter IP | 192.168.10.123 |
| Orin dual-arm connection IP | 192.168.10.190; must match the dual-arm controller IP |
| Router IP | 192.168.10.1 |
| Headset Apex app connection IP | 192.168.10.123; must match the Orin IP |
| SSH login to Orin | ssh marvin@192.168.10.123 |
| Login credentials | Use the credentials supplied with the device; they are not published here |
| Item | Specification |
|---|---|
| Operating system (Orin) | Ubuntu 22.04 ARM64 |
| Operating system (host development PC) | Ubuntu 22.04 AMD64 |
| Robot framework | ROS 2 Humble |
| Main control hardware | NVIDIA Jetson Orin |
| Headset | Meta Quest (VR-side APK) |
| Package format | kernelmind-apex_<version>_arm64.deb |
When an independent router is the LAN gateway, the DHCP gateway must point to the router. Use the Orin address only when Orin is explicitly configured to provide the network service without an independent router.
When changing the DHCP subnet, first assign the Orin Ethernet interface a static address in the new subnet. Otherwise, the DHCP service may fail to listen. A network administrator or technical support should coordinate subnet changes.
Wiring
Wiring an Orin unit covers the arm power supply and communication, the Orin and its camera deserializer board, and the network.
Disconnect the main power before wiring. Confirm that all Ethernet cables, power cables, and camera harnesses are firmly connected before powering on.
Arm power and communication
Complete the following wiring while the main power is disconnected:
- Connect the dual-arm robot
48V+/48V-to the positive and negative DC outputs of the220V-48Vswitching power supply. - Connect the discharge module
48V+/48V-in parallel to the same 48 V power supply. - Connect the emergency stop box in series to the robot emergency stop control loop.
- Connect the left-arm and right-arm
EthCartEthernet ports to the corresponding robot controller ports. - Connect the
12Vpower supply to the robot controller power input. - Connect the uplink Ethernet cable (Cable 1) to the robot controller network interface.
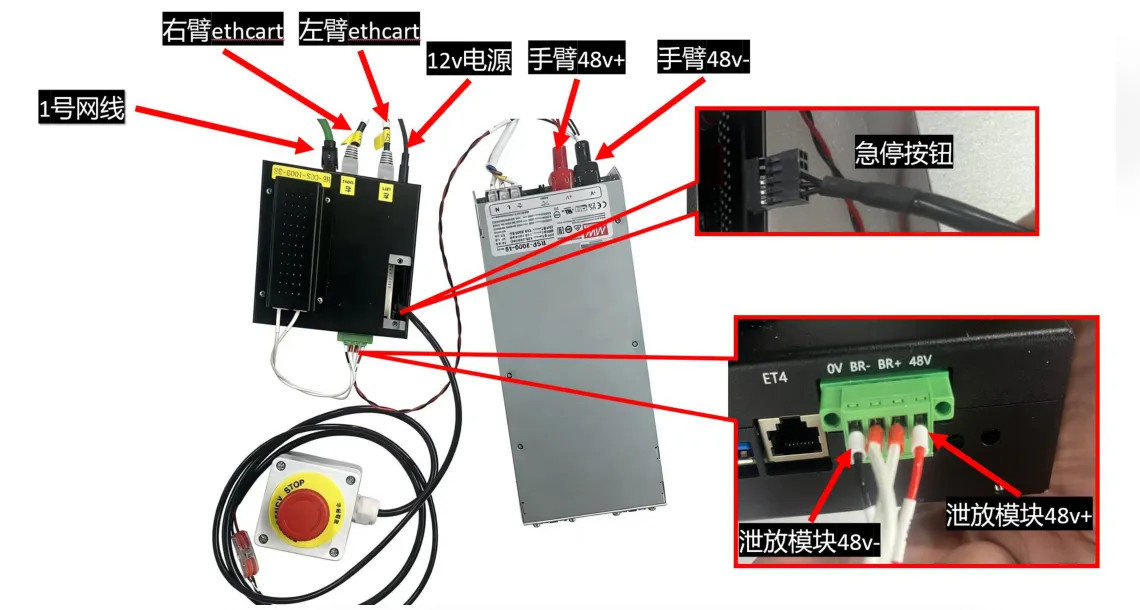
Wiring notes:
48V+and48V-polarity must be correct. Reverse connection is strictly prohibited.- Release the emergency stop button before starting the system.
- When using the system for the first time or after replacing the controller, confirm that the robot controller IP is
192.168.10.190. - During power-on, turn on the
220V-48Vswitching power supply first, then the robot controller12Vpower supply.
Orin and camera deserializer board
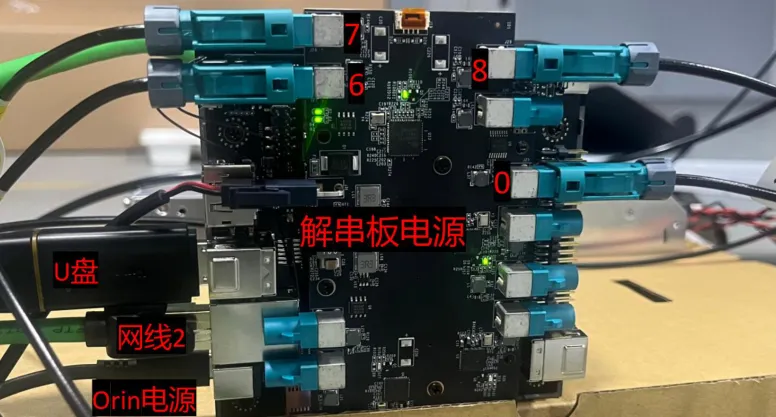
The camera deserializer board is installed at the bottom of Orin and supports up to four GMSL camera inputs. During installation, remove the Orin base first, install the deserializer standoffs and board, then reinstall the base screws.
Camera interface mapping:
| Deserializer interface number | Corresponding camera |
|---|---|
| 8 | Left-eye camera |
| 6 | Left-wrist camera |
| 7 | Right-wrist camera |
| 0 | Right-eye camera |
When connecting cameras and peripherals, connect them in order:
- Camera harnesses
- USB drive, label must be
BAG_STORAGE - Ethernet cable 2, connected to Orin
- Deserializer board power
- Orin power
Network cables
The robot controller, Orin, and VR headset adapter must be connected to the same router through Ethernet, ensuring that all three are on the same LAN.
| Cable | Connection target |
|---|---|
| Cable 1 | Connects to the robot controller |
| Cable 2 | Connects to Orin |
| Cable 3 | Connects to the VR headset adapter |
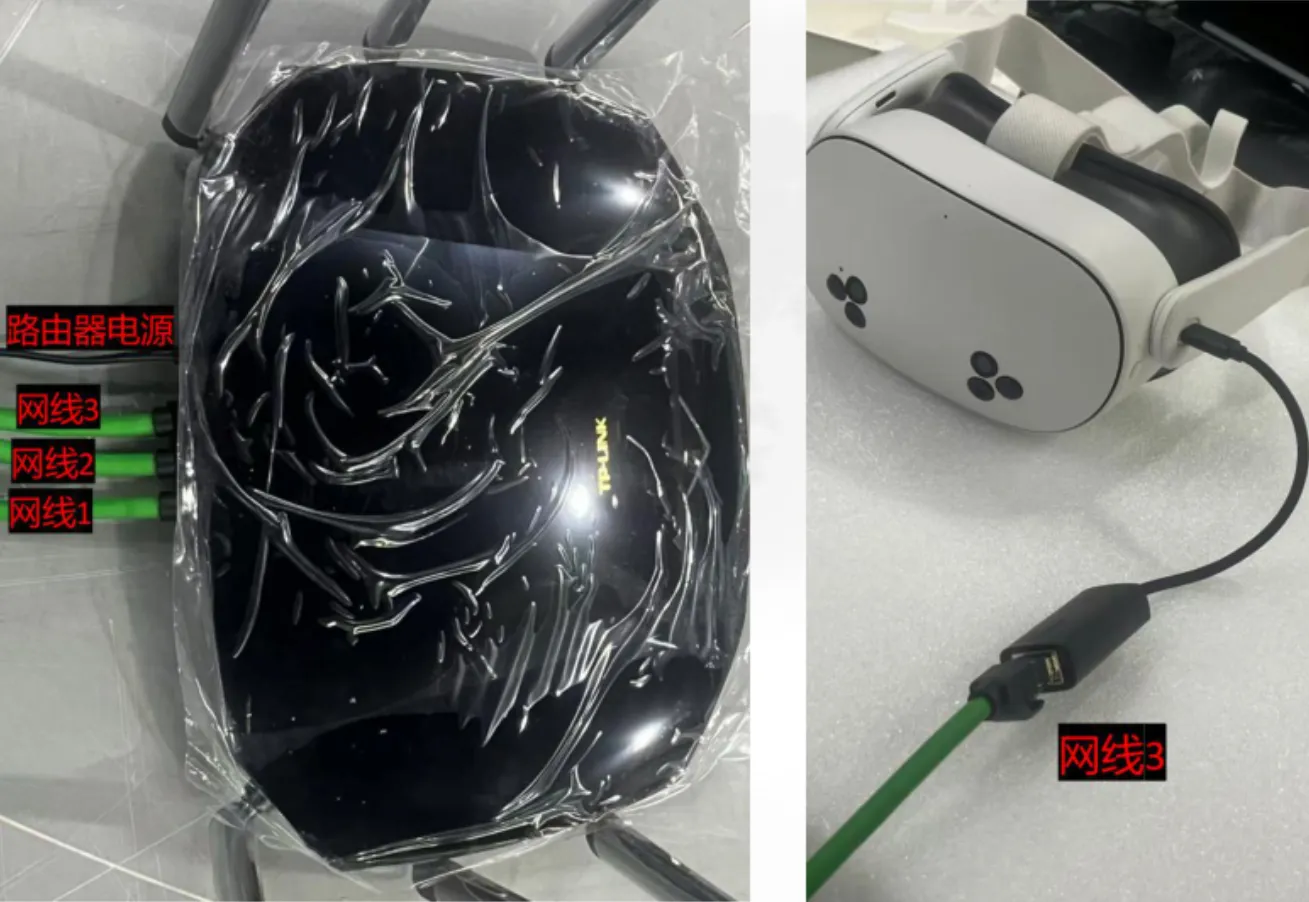
Default network parameters:
| Device | Default IP |
|---|---|
| Robot controller | 192.168.10.190 |
| Orin main controller | 192.168.10.123 |
| Router | 192.168.10.1 |
| Headset Apex app connection IP | 192.168.10.123 |
Move the arms to the initial pose
Use fxstation or MarvinPlatform to move both arms to the initial horizontal end pose before teleoperation. The figure below uses the left arm as an example; the right arm follows the same procedure.
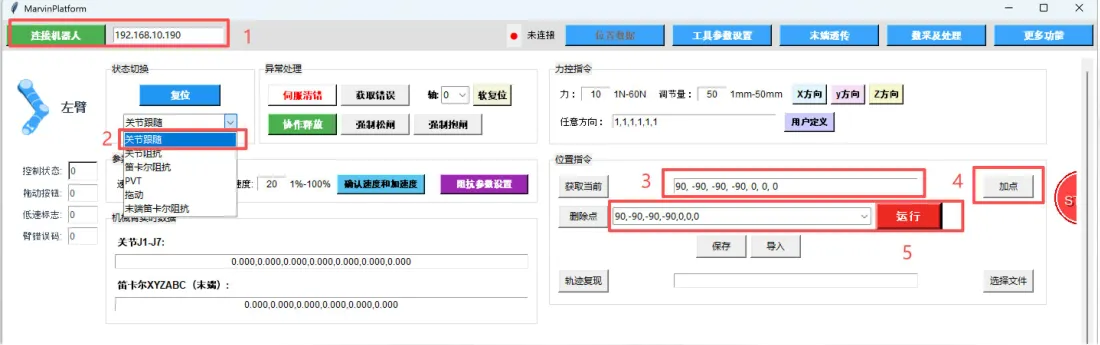
Procedure:
- Enter the robot IP address, default
192.168.10.190, and connect to the robot. - Switch the robot arm to Position Mode.
- Switch to Joint Follow mode.
- In Joint Follow mode, first return to zero position, then write the target points:
- Left arm:
[0, 0, 0, 0, 0, 0, 0]->[90, -90, -90, -90, 0, 0, 0] - Right arm:
[0, 0, 0, 0, 0, 0, 0]->[-90, -90, 90, -90, 0, 0, 0]
- Left arm:
- Click Add Point to add the current point to the trajectory list.
- Click Run. The default speed is 20%. Move the arm to the target pose.
- Exit the software after motion is complete.
Before moving the robot, confirm that there are no people, devices, or obstacles within the arm motion range.
Power-on check
| Step | Operation | Checkpoint |
|---|---|---|
| 1 | Turn on 48 V main power | Confirm robot-side power is normal |
| 2 | Turn on controller 12 V power | Confirm the robot controller starts normally |
| 3 | Power the deserializer board first | Wait about 10 seconds |
| 4 | Then power on Orin | Wait about 1 minute and confirm Orin startup is complete |
| 5 | Check camera interface indicators | Confirm all four camera interface indicators are steady on |
| 6 | Check network | Host PC, Orin, robot controller, and headset are on the same subnet |
If not all camera indicators are on, first check the camera harnesses, deserializer interface numbers, and deserializer power supply.
Start teleoperation
For buttons, recording, playback, and logs, see Classic Apex Teleop.
Start the Orin back end
The following uses the historical default IP 192.168.10.123. Use the delivered site value if it differs.
ping 192.168.10.123
ssh marvin@192.168.10.123
cd /opt/kernelmind/apex
./bringup_RM.sh
Disable
X11-Forwardingin MobaXterm to avoid camera timeout or headset video issues.
Start classic Apex Teleop
- Open the Apex Teleop version delivered with the system.
- Enter the Orin IP and connect.
- Start Robot and verify that the 3D model matches the physical robot.
- Start Teleop and the required network module. Camera is optional.
- Use the robot start control to set the robot Ready.
- Select Impedance Mode, then execute Home.
- Connect the headset and begin teleoperation.
Headset
Historical deliveries may use Meta Quest or Pico:
Update the software
- Use the Orin software, classic Apex Teleop, and headset client delivered for the device.
- Historical systems may use Meta Quest or Pico.
- Do not apply current Tianzhun addresses or packages to an Orin system.
Historical Orin systems require packages matched to their hardware and ROS 2 environment. Back up network, robot, camera, Home, and end-effector configuration and record all current versions before updating.
sudo apt install ./<orin-controller-package>.deb
Use host and headset packages from the same delivery release. After updating, verify Robot, URDF, camera, and logs, then test Home and small teleoperation motions in a clear workspace.
Do not install current Tianzhun packages on an Orin system. Confirm compatibility with technical support before robot-controller or servo firmware updates.
Troubleshooting
| Symptom | Check first |
|---|---|
| Cannot connect to Orin | Router, Orin IP, host subnet, and cables |
| DHCP service fails | Orin interface static IP and DHCP subnet consistency |
| Robot fails to start | E-stop, power, arm-controller network, and Robot log |
| Teleop unavailable | Robot running and Ready state |
| Headset not connected | Target IP, router, network service, and adapter |
| Camera is black | Camera module, wiring, external deserializer, and log |
| No teleoperation motion | Impedance Mode, Home, and headset state |
See Classic Apex Teleop. Press the emergency stop immediately for abnormal motion or mechanical interference.