Skye and Luna: first teleoperation
Skye and Luna support full-body teleoperation with Apex. Each delivered robot integrates a Tianzhun 003 control unit, four cameras, and the hardware required for teleoperation. The operator wears a Pico headset, arm units, one waist tracker, and two leg trackers. Skye maps motion to both arms, BODY, and LIFT, while Luna maps motion to both arms, BODY, and legs.
This page covers the minimum sequence from power-on to first full-body teleoperation. For buttons, recording, playback, and logs, see Classic Apex Teleop.
1. Kit and product differences
| Component | Description |
|---|---|
| Skye robot | Executes dual-arm, 2-DOF BODY, and 1-DOF LIFT teleoperation; it has no knee joints |
| Luna robot | Executes dual-arm and 6-DOF BODY teleoperation with a knee-style body structure |
| Tianzhun 003 control unit | Runs Apex and ROS 2 control services |
| Four cameras | Provide a four-tile first-person and environment view |
| Pico headset | Displays video and provides head tracking |
| Wearable arm units (left/right) | Capture operator arm motion |
| Waist tracker | Captures torso pose |
| Leg trackers | Two trackers capture lower-body motion for Skye BODY/LIFT or Luna leg mapping |
| Host PC | Runs the classic Apex Teleop interface |
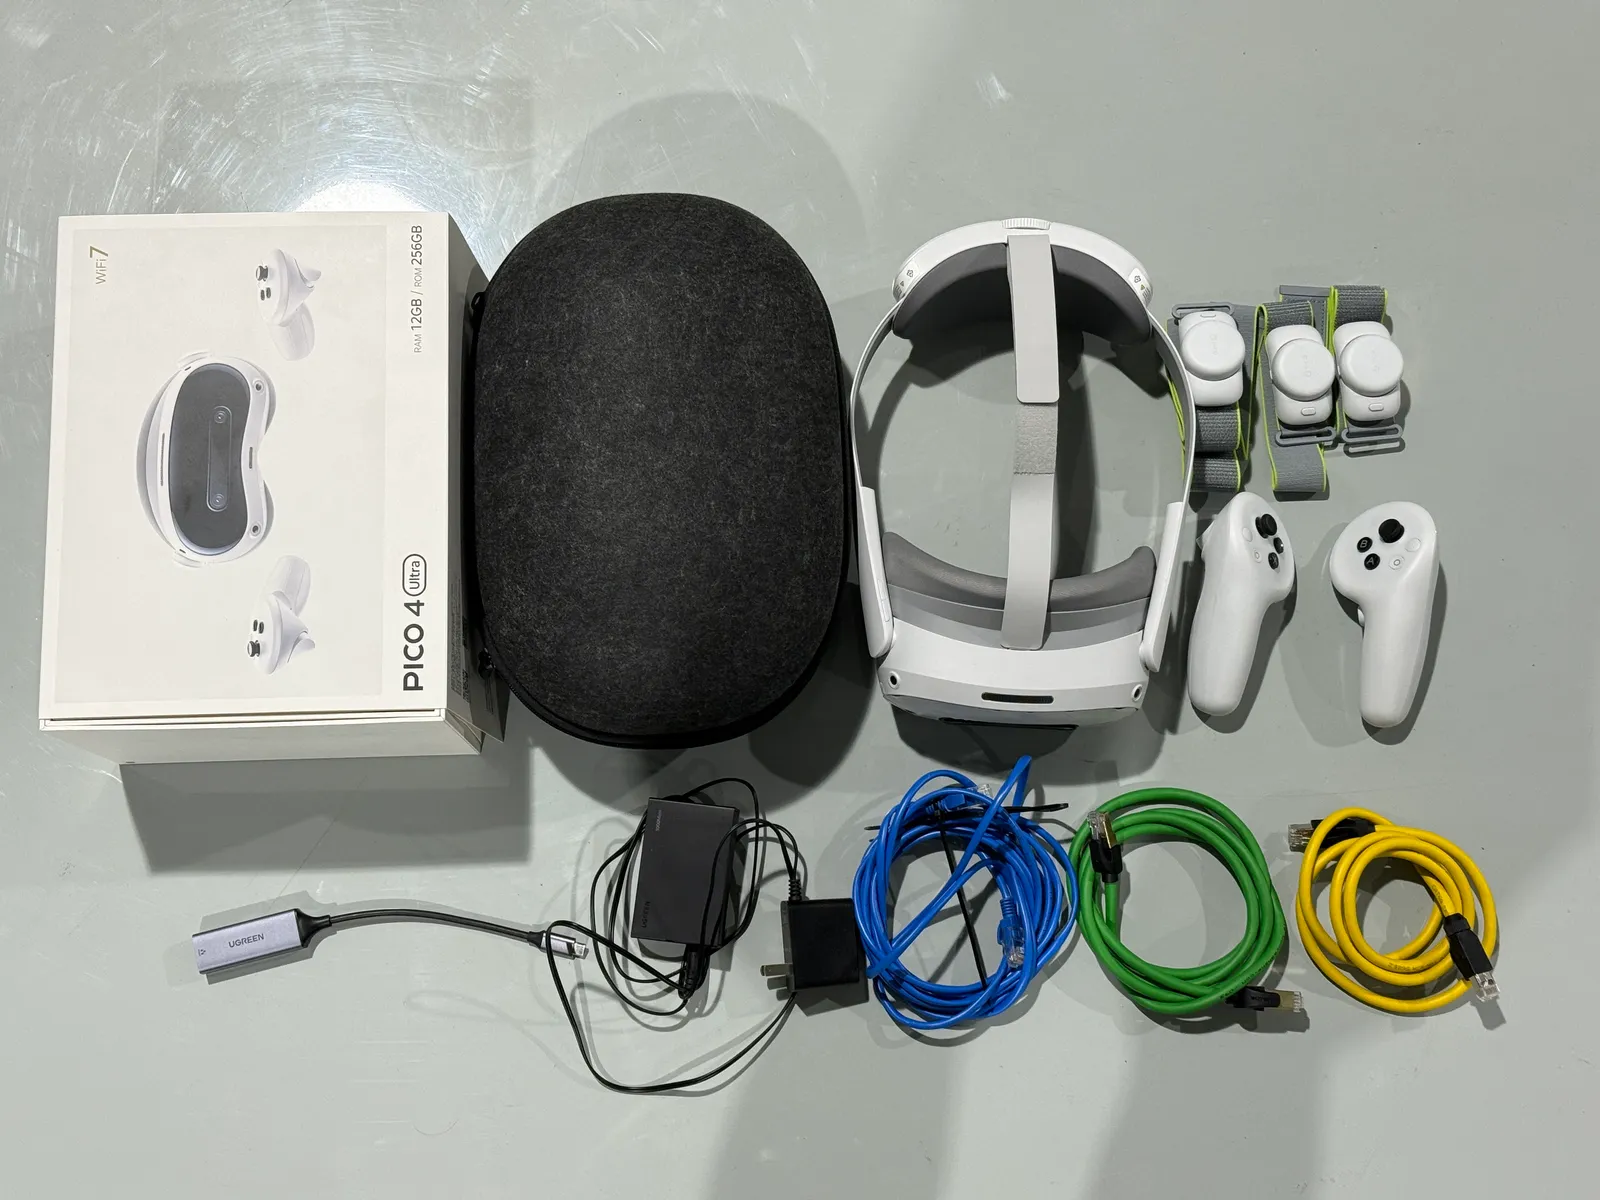
Standard accessories
| Accessory | Qty | Description |
|---|---|---|
| Pico headset | 1 | Headset used for Skye/Luna full-body teleoperation |
| Wearable arm units (left/right) | 1 each | Capture arm motion |
| Waist tracker | 1 | Captures torso pose |
| Leg trackers | 2 | Capture lower-body motion for Skye BODY/LIFT or Luna leg mapping |
| Ethernet cables | Several | Connect the robot, host PC, network device, and headset adapter |
| Type-C Ethernet adapter | 1 | Connects Pico to the wired LAN |
Software
| Software | Location | Description |
|---|---|---|
| Apex controller software | Tianzhun 003 | Current source-review snapshot is v1.0.6.95g-beta-10-g14cfc0d; use the customer package listed in the delivery manifest |
| Teleop service | Host PC | Use the matching version from the same delivery release; processes teleoperation data |
| Apex frontend | Host PC | Use the matching version from the same delivery release; connects the robot, switches modes, records, plays back, and displays logs |
| Apex Pico client | Pico headset | Network connection, video display, and full-body teleoperation input |
To install or update, see Install or update Apex.
Product differences
- Skye has a 2-DOF BODY and 1-DOF LIFT with no knee joints. Luna has a 6-DOF knee-style body structure.
- Both Skye and Luna use one waist tracker and two leg trackers for full-body mapping. Marvin Pro primarily supports dual-arm teleoperation.
- Skye/Luna uses Pico waist and leg tracking and does not use Meta Quest as the standard full-body headset.
- Skye/Luna currently uses the classic Apex Teleop interface.
2. Wear the trackers
- Pico headset: adjust for a clear view and secure fit.
- Wearable arm units: distinguish left and right and keep elbow motion unobstructed.
- Waist tracker: wear it on the back in the specified orientation.
- Leg trackers: install both trackers at the specified positions for full-body tracking. Skye still requires the leg trackers even though the robot has no knee joints.
- Check battery, connection, and tracking state before use.
Install the left and right units and the leg trackers without swapping sides. You calibrate the trackers in the headset client when you connect (step 7).
3. Network wiring
When Skye/Luna is shipped, the Tianzhun 003 control unit is already integrated inside the robot. On the user side, network, peripheral, and headset connections are mainly completed through the exposed rear interfaces. The overall wiring principle is the same as Marvin Pro: the robot, host PC, headset, and router / switch must be on the same LAN.
Connect the network as follows:
For wired headset networking, connect a Tianzhun controller to Ethernet port 1 and a Lingjing Thor controller to Ethernet port 2. Both controllers use 6.6.7.100 as the default connection address. Do not interchange the two ports. If the site network was changed, follow the delivered configuration.
- Connect the robot rear Ethernet port to the router / switch.
- Connect the host PC to the same router / switch.
- Connect the headset to the same router / switch through the Type-C Ethernet adapter.
- Confirm that the robot, host PC, and headset are on the same subnet.
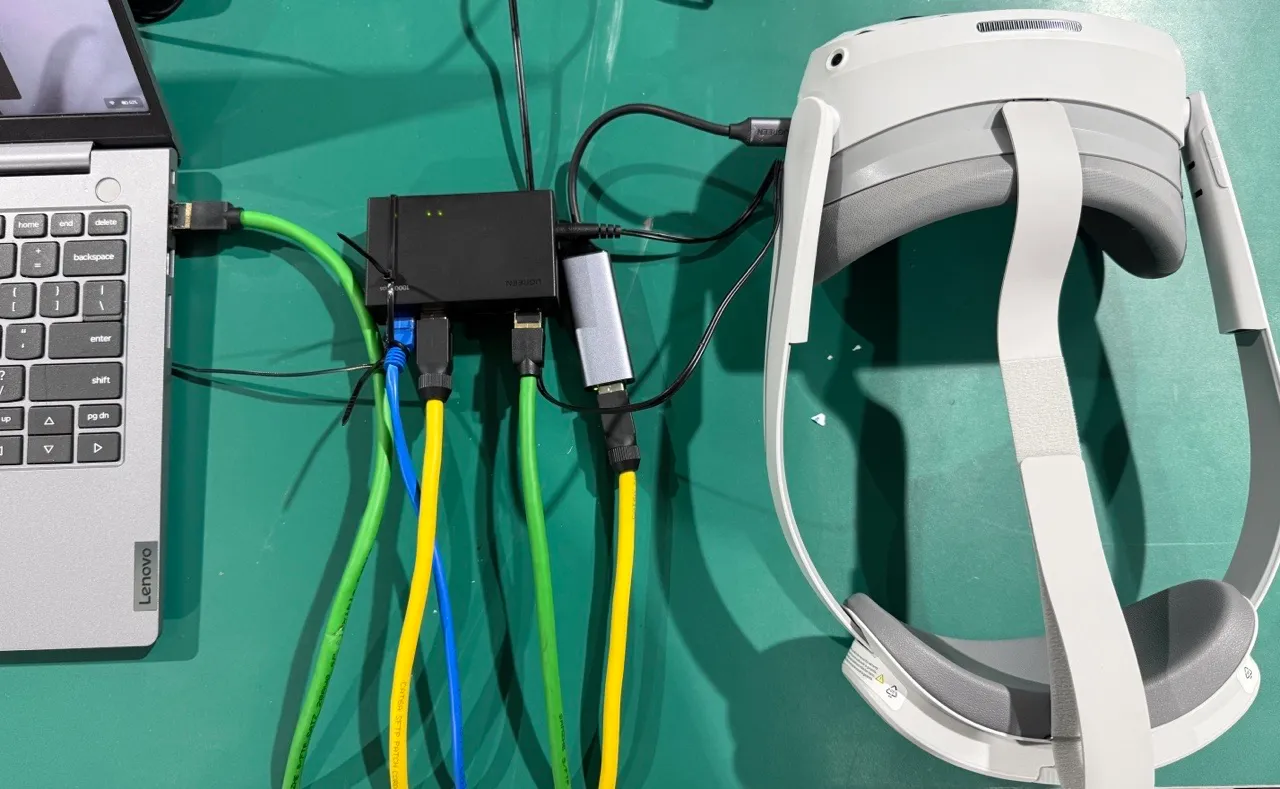
Rear interfaces differ between the two robots; see Skye rear interfaces and Luna rear control panel.
Wiring check
Before powering on and starting the system, check each item:
| Check item | Requirement |
|---|---|
| Robot rear Ethernet port | Ethernet cable is firmly inserted and connected to the router / switch |
| Host PC network | On the same LAN as the robot |
| Headset network | Wired access through the Type-C Ethernet adapter |
| Power and emergency stop | Power connection is normal and the emergency stop button is released |
| Cable status | Ethernet cables, adapters, and power cables are not loose |
Notes
- Headset Wi-Fi is not recommended for teleoperation. Use the wired network connection first.
- Connect the headset cable to port 1 for a Tianzhun controller and port 2 for a Lingjing Thor controller.
- After wiring is complete, proceed to environment configuration and startup debugging.
- If the host PC cannot connect to the robot, first check the Ethernet cable, router / switch, power, and IP subnet.
Network settings
| Device | Description |
|---|---|
| Tianzhun 003 | Default examples use 6.6.7.100; use the actual site address if changed |
| Host PC | Same subnet as Tianzhun 003, with no conflict |
| Pico | Independent address on the same subnet; the client connects to Tianzhun 003 |
ping 6.6.7.100
Pico must not use the same IP as Tianzhun 003. When changing the site subnet, update the host, Pico, and network-service configuration together.
4. Before startup
- Connect the robot, host PC, network device, and Pico according to Hardware Wiring.
- Release the emergency stop and clear the workspace.
- Put the host PC and the robot's integrated controller on the same subnet.
- Charge and correctly wear the Pico headset, waist tracker, and leg trackers.
5. Connect to the controller
Select the address and account for the controller installed in the device. These are factory defaults; use the delivery configuration if the IP address, username, or password has been changed.
| Controller | Default IP | Username | Default password |
|---|---|---|---|
| Tianzhun 003 | 6.6.7.100 | nvidia | nvidia |
| Lingjing Thor | 6.6.7.100 | user | 1 |
Tianzhun 003 control unit:
ping 6.6.7.100
ssh nvidia@6.6.7.100
Lingjing Thor controller:
ping 6.6.7.100
ssh user@6.6.7.100
Enter the corresponding default password on the first SSH connection. If the delivered device already uses a changed password, do not attempt to restore the factory default.
Start the Apex backend service:
sudo systemctl start apex-backend.service
sudo systemctl status apex-backend.service --no-pager
After every power-up, start the cameras before you teleoperate.
6. Start classic Apex Teleop
- Open Apex Teleop.
- Enter the current controller IP and press Enter.
- Start Robot and verify that the 3D model matches the physical robot.
- Start Teleop and the network module. Camera is optional.
- Use the robot start control to set the robot Ready.
- Select Impedance Mode, then execute Home.
- Verify both arms and the physical robot pose. For Skye, also verify BODY and LIFT; for Luna, verify BODY and the knee-style body structure.
7. Connect Pico
Skye/Luna uses Pico with waist and leg trackers for full-body teleoperation. Follow the Pico headset guide for developer mode, network, and Apex client setup.
To switch among full-body, arms-only, arms-and-head, or mobile-base teleoperation, follow Teleoperation Modes and Input Sources. Release both controller enable buttons before changing the motion range.
After connection, test small arm motions first. For Skye, verify torso and lift mapping; for Luna, verify torso and leg mapping. Increase the range only after all directions are correct.
Before connecting, put on and calibrate the body trackers. In the headset client, confirm the operator height, the controller IP, and the end effector, then connect. When the VR indicator in Apex Teleop turns green, press Y on the left controller to start, and hold the side grip to operate.
8. Quick checks
| Symptom | Check |
|---|---|
| Cannot connect to the controller | Controller type, IP, account, host subnet, and cable |
| 3D and physical poses differ | Robot module, model configuration, and startup log |
| Teleop unavailable | Robot running and Ready state |
| Pico cannot connect | Network module, headset IP, cable, and client settings |
| Arms move but BODY/LIFT or lower body does not | Model configuration, tracker charge, placement, and tracking state |
| Camera is black | Camera module and camera connection |
| No teleoperation motion | Impedance Mode, Home, and headset connection |